Ads 468x60px

Showing posts with label Science. Show all posts

Jan 22, 2013

Water Cycle: Oceans

POST LAB
OBJECTIVES:
  • Exploring how the oceans became salty.
  • Discovering the components of salt water.
VOCABULARY:
  • elements
  • erosion
  • evaporation
  • oceans
  • salt 
(I highly recommend using a children's dictionary to go over vocabulary words so they clearly understand each word)
MATERIALS:

Jan 20, 2013

Water Cycle: Oceans

Dissolving Salt in Water
OBJECTIVES:
  • Dissolving salt in water.
  • Observing how salt crystals form.
VOCABULARY:
  • evaporation
  • salt
MATERIALS:
  • salt 
  • Epsom salt
  • trays
  • warm water
  • pan
  • rope-like string (mop string) 
  • measuring beakers
  • two jars or beakers. 
Students experiment with salt crystals.

Water Cycle: Oceans; Making Salt Water

OBJECTIVES:
  • Comparing fresh and salt water.
  • Discovering bodies of fresh and salt water.
VOCABULARY:
  • fresh water
  • ocean water
MATERIALS:
Students use a worksheet to compare fresh water with salt water.

Jan 16, 2013

The Water Cycle: Discovering How Water is Used by Humans

OBJECTIVES:
  • Exploring components of water.
  • Discovering how water is used by humans.
VOCABULARY:
  • hydrogen
  • oxygen
  • water
MATERIALS:
 
Students use a worksheet to learn about ways to  clean water.
Before you begin a little review might need to take place to refresh the vocab words and the water cycle.

Jan 15, 2013

The Water Cycle: Experiencing Surface Tension

OBJECTIVES:
  • Discovering properties of water. 
  • Experiencing surface tension.
VOCABULARY:
  • flow
  • fluid
  • surface tension
  • water
MATERIALS:
Students experiment with water to discover properties.
 
BACKGROUND: Water remains a liquid over a very wide temperature range, namely, a range of 0°C to 100?C,  between freezing and vaporization.   This spans the temperatures of most parts of the Earth where life can occur.

Water has a very high specific heat, which means that it can absorb or lose much heat before its temperature changes. It takes a lot of energy to start evaporation because water has a high latent heat of vaporization.  For this reason, water evaporates slowly from ponds and lakes, where many life forms are dependent on it.

Water is less dense in its solid state than in its liquid state, so that ice floats instead  of sinking.  This property permits life to develop in polar regions and subpolar regions where ice floats and allows life to continue living below the surface.  If ice were heavier than water, it would sink, and more ice would form on top of it.  As a result, all life in the waters would be trapped in the ice in the many areas of the world where it gets cold enough to freeze water.
Water's surface tension (the ability of a substance to stick to itself) makes it an excellent substance to float heavy objects upon.  Water not only sticks to itself, but also to other surfaces, and this allows it to move against gravity, which is very important to plants when transporting water form the soil to their leaves.  This upward motion is known as capillarity or capillary movement.
PROCEDURE: This exercise consists of two parts.  First, the students will discover how  water flows and secondly, the students will discover how many drops of water they can put on a penny.
  1. In the first exercise give each child two cups.  Have them measure 1 cup of water into one cup.
    Let them hold both cups and ask them the following questions:
    Which cup contains a fluid?
    Which cup contains melted ice?
    Which cup contains air?
    What is the fluid?
     
  2. Next ask the students to pour the liquid.  Ask them to describe the liquid.  The water is flowing; it is a fluid called water.
      
  3. In the second exercise give each student an eyedropper and penny.  First discuss surface tension by using the following illustrations. Surface tension is what allows  a water strider (insect) on water not to sink and explains why heavier items in water, float.  In this exercise the students will experience surface tension by seeing how many drops of water  they can put on a penny with an eyedropper.  Ask students to predict how many drops can fit on a penny.   You are going to have to illustrate and demonstrate very carefully how to use an eyedropper.
      
  4. Using an eyedropper, gently let water drops fall into the center of the penny.  Count how many you can put on before the water runs off.  (It will be between 20 and 34.)  Let the children try this.  Their numbers will be lower than yours, and will change depending on whether they are letting the drops fall into the center of the penny or on the edge.
      
  5. You may want to extend this lab by seeing how many drops they can place on a nickel.  Go over their results.  You may also want to repeat the experiment with alcohol.  It has a much lower surface tension and will not be able to hold as much liquid.
      
  6. The key concept here is to have the students experience surface tension and to be able to observe surface tension when they leave the classroom.  
After we finished graphing the amount of drops the penny could hold we tried the experiment on a nickel and quarter. But before we tested out the experiment I had my boys guess how many drops each would hold and record their guess in their science lab journals. Each was surprised by how many drops the quarter and nickels held but also thought it was fun to see the end results. 

This is really simple lab to show surface tension and can be found at msnucleus.org. Under elementary/water cycle/first grade/experiencing surface tension. Make science a fun part of homeschooling!

Jenna

Jan 14, 2013

The Water Cycle: The Properties of Water

When the word 'SCIENCE' is mentioned in my house all the little ears perk up just as if I said the word 'cookies.' For our third unit (weeks 18-21) of First Grade Science we will be studying the Water Cycle. Its a four week unit consisting in studies of The Properties of Water (week1), Making Salt Water (week 2) Movement of Air (week 3), Reading A Thermometer (week 4). Each week is broken into three parts: a pre-lab, lab, post-lab.
from msnucleus.org
Today's post is just about week 1: The Properties of Water Pre-Lab

Objectives:
  • Investigating the water cycle 
  • Exploring water's three states of matter
Vocabulary
  • evaporation
  • gas
  • liquid
  • precipitation
  • solid
  • water cycle   
Materials:
The hydrologic or water cycle is a major driving force on Earth. Water is important to our everyday lives. First grades see water all around them, but many do not realize its importance. Ask students if we can survive without food or water longer. They are usually amazed that humans can survive without food much longer than water. Humans can only last about three days without water. At that time our kidneys will no longer function, and we will not be able to get rid of the wastes that accumulate in our bodies. Our bodies require fresh clean water to survive. Polluted or salty water will not help our bodies-God made us this way!

Water circulates in the atmosphere through the water cycle. The water on Earth evaporates (or becomes gas) into a cloud. When the conditions are right, the cloud releases water or precipitation.

Procedure:
1. Discuss the different components of the water cycle by having students sing-along to Drippy the Hippie.   
Ok I know, I know this is really chessy, but who cares if your kids learn something and it does not 
disagree from Biblical teaching, even if it's granola ;)

2. Make copies of the worksheets for your students. Color the worksheet and cut out the pieces. 
   
 3. Have students use the pieces they cut out to make the water cycle. Then go over the components of the water cycle with the students slowly. Evaporation from water forms clouds and then precipitates.

Review by asking a few questions:
  • What is evaporation?
  • Is evaporation a gas? 
  • Name a form of precipitation? hail, snow, rain, or sleet
  • Can we drink water from water puddles in the street? Why not?
  • Is water that falls from the sky clean?   
  • Explain the water cycle to me.
All of this and more units can be found at msnucleus.orghttp://www.msnucleus.org/membership/index.html

Follow along for tomorrow's post on the lab on Water Cycle!
 Jenna   

Oct 25, 2012

Science: Human Made, Natural Made


Welcome! Science is a favorite subject in this house because it usually means interesting books to look at or read, a lab that makes a mess, and a lot of washing our hands when its all done. Well this week was no exception to that. For three days we learned about things that are human made versus things that are naturally made. In our house natural means God made it and it stays the same and human made means the men that God created to natural things and changed them into something else.

PRE LAB: Students use a worksheet to compare Human and Natural made.
OBJECTIVES:
  • Recognizing the difference between artificial and natural.
  • Exploring the requirements of being "naturally" made.
VOCABULARY:

  • artificial
  • consumer
  • human-made
  • natural
MATERIALS:
  • worksheet

Oct 8, 2012

Applied Science: Technology Part 3

POST LAB:
OBJECTIVES:
  • Discovering how other organisms live without tools.
  • Exploring how machines help people work.
VOCABULARY:
  • tool
  • machine
MATERIALS:
We like how the elephant uses his trunk to scratch his ears ;)
*An elephant uses its trunk as a hand. The trunk can carry a 600-pound (272-kilogram) log or an object as small as a coin. Elephants also breathe and smell with their trunks.
Students listen to a story about other organisms that use tools.
BACKGROUND: Children take tools and gadgets for granted because they are familiar objects in our society. They rarely think about what humans would do without them. Ask children if animals use tools? Make several mental pictures for the students such as a dog or cat that uses a can opener, or a horse that rides a bicycle. Children might chuckle, but you want the students to think about what do animals use to carry, break, or move things?
Early humans had to use twigs and stones as their tools to cut and move. Round stones and sticks allowed humans to move heavy objects. Certain rocks like obsidian could be faceted into cutting tools. Other rocks could be carved to grind corn and grain into meal. Humans had the ability to make tools that helped them to create new construction that other animals could not.
PROCEDURE:
  1. Animals use their natural shape to help develop strategies to cope with the natural world. Use the book, An Elephant Never Forgets its Snorkel to illustrate how animals accomplish naturally what humans need to use tools or gadgets. You probably do not want to read the text to the children, but the illustrations help get the point across to the students. Use the information to help you understand.
      
  2. Below are examples of how to emphasize these gadgets using the illustrations in the book.
  1. A human uses a snorkel to breathe underwater, but an elephant "snorkels" with its trunk.
  2. Humans wear a rain coat to stay dry but ducks have waterproof feathers by using their body's oil.
  3. Humans built homes and high-rise buildings by using machines. African ants construct a home by making "cement" from their saliva.
  4. Humans protect their eyes by using sunglasses, a polar bear's eye "closes" down automatically when the sun gets too bright.
  1.  Have a discussion on how they think different tools were created. This session could be a wild side into how young children think things were invented.
Happy Science Homeschooling,
Jenna

Oct 3, 2012

Applied Science:Technology Part 2

LAB: SIMPLE MACHINES PART 2


BACKGROUND: A lever can help move heavy objects by using weight effectively. A see-saw is a lever that helps you pick up another person of the same or greater weight. 
A wheel and axle work together to make objects move easily. A car, bicycle, and motorcycle all use wheels and axles. 
A gear helps distribute energy and moves objects. Many machines such as cars, lawn mowers, and bicycles have gears. Students will be most familiar with the gears on a bike. 
A pulley helps lift and move difficult objects. Examples include two pulleys on a clothes-line or big cranes that lift large objects. A wedge helps to concentrate energy. If a logger wants to cut a log, an axe is used.
PROCEDURE:
  1. Discuss different machines that use simple machines. Students have learned some basic words to help them describe how a simple machine works. Go over the vocabulary list and show or discuss examples of each of the simple machines.
      
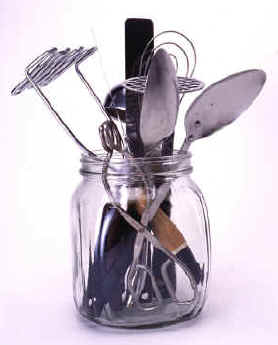
  2. In your module use a garlic press, an apple peeler, an egg beater and smasher. Show each of the machines to the students and slowly go over the function of each of the machines. In this exercise the students should look at several ways that these mechanisms work.
      
  3. This activity works best if you have adults at each area demonstrating the different simple machines. Have the students examine and experiment with each machine except for the apple peeler. 
Station 1. APPLE PEELER. Have the children guess what is going to happen to the apple when the apple peeler is used. Go over the parts of the apple (skin, core, meat) as you cut the apple skin away from the meat. The apple peeler is used as a lever to cut the apple. The blade however, is shaped as a wedge. Give each child a sample of the apple to test.


Station 2. EGGBEATER. Have the children try and make the eggbeater work in a tub of soap water. Emphasize that they are using gears to make the eggbeater move. Students love this activity, so prepare for a mess!


Station 3: Garlic press/slicer: Have the children try and figure out how the garlic press works. You may want to demonstrate if they are frustrated. Let them play with it before and after learning that the press is a lever. (optional: use a ball of clay with a egg slicer instead)

Station 4. Potato masher.  Have the children hold the handle with both hands then push down into the potatoes. (hint: over-boil the potatoes so they're easier to mush up).
It was quite entertaining watching Junior move through each station and discuss what he thought each tool was for. He enjoyed using the hand and electric egg beaters the best but also thought smashing the potatoes was fun as well. I really enjoy these special moments learning alongside my son and seeing him explore the world around him.

Happy Homeschooling!
Jenna

Oct 2, 2012

Applied Science: Technology


PRE LAB: Simple Machines

OBJECTIVES: Exploring different tools. Discovering technology.

VOCABULARY: 
  • machine
  • physics
  • society
  • technology
 MATERIALS: 
  • tools (hammer, screw driver, pliers, wrench, nails, wood, something with a lid to unscrew)
  • worksheet  
BACKGROUND:
Technology is using knowledge to improve society. Many tools and machines are created to help humans work easier. Without tools and machines our society would progress very slowly. Children today cannot think about living without television, much less the many machines we depend upon.
A simple machine is a term used in mechanics ( a branch of physics) to describe fundamental devices that help do work more effectively. The basic simple machines are wheel and axle ( to make things move); a lever (to help make work easier); and a wedge (to help direct energy to be more efficiently). Tools use the principles of simple machines. Simple machines could very well be the first technology ever invented by humans.
PROCEDURE:
  1. This exercise introduces students to simple machines. Show your students any tools you might have. If there is a janitor at your school, have the janitor illustrate all the tools they use to help make their job easier.
       
  2. Use the worksheet to illustrate examples of tools that help make work easier. Simple machines were invented to make life easier. Students do not have to understand how or what simple machines are. The focus is to exposure them to new words and the association of words with an object.
OPTIONAL: Set up three stations your students can work through trying out each tool and learning how to use them.
Station 1: working with a hammer using both ends as a simple machine.


Station 2: Match the tools to their use. First I had him try to use his fingers then the tools to decide which was easier. He decided to get them started the tool, to really tighten them down-the tool.


Station 3: Using a wrench to open and close a screw. Again I let him choose which one he thought would work best, first he chose the pliers then tried the wrench.


WHEELBARROW - makes moving heavy objects easier, move faster
WRENCH - lever, can direct energy to tighten or loosen screws or nuts
SHOVEL - a lever and wedge that directs your body to pick up soil
PULLEY - helps to lift objects
RAMP - helps lift large objects
PLIER - helps open and close objects easily
HAMMER - the portion that helps remove nails is a lever
SCREW - helps to secure objects

WORKSHEET:
 
 I was surprised to find that Junior already knew the name of almost all these items and what they are used for. This is probably due to the fact that he's always hanging out with papa and his cool inventions. Overall this is a great way to kick-off learning about Simple Machines in our Technology unit of Science and how we use them on a daily basis to make our lives easier. 

Grace to You,
Jenna
Related Posts Plugin for WordPress, Blogger...

Popular Posts


A Mother's Prayer

Lord bless my home and anyone who enters. Lead me daily so that I am always aware of You! Whether educating my kids, cooking or cleaning may my attitude always be that of a servant. Give me the words to guide my children to You, to know You, Your character and love You, Lord. Please teach to have patience and to always be learning. Lord mold me through each stage of life so I am continually growing and pursuing You no matter what. Lord I want to be a great mom and wife and I know that if I look only to You for help that I can accomplish this, the love for my family that I desire to show them. Lord I'm amazed by You and I love You. Amen.

Full of Life, Full of Love

"The spirited child-often called "difficult" or "strong-willed"--possesses traits we value in adults yet find challenging in children. Research shows that spirited kids are wired to be "more"-by temperament, they are more intense, sensitive, perceptive, persistent, and uncomfortable with change than the average child." It seems as though we have three, and they are very much like me. What does this mean? I need to be compassionate, consistent, confident, controlled, all with a gentle yet firm approach. Yes my plate is full.

Motherhood: A rigorous training ground

What an awesome responsibility mothers have to their children. Cultural stereotypes promote the idea that giving birth miraculously endows women with kindness, compassion, and goodness. But we all know better. Many of us can witness that we are made more aware of our weaknesses and impatience after becoming mothers than we were before. Godliness and generosity are not prerequisites of giving birth; they are characteristics that God hones and whittles into our character over time. Motherhood provides a rigorous training ground where we can display practice and model the disciplines of love, honesty, and compassion before our children. --Rebecca Laird